
Because of the high demand for Gitti's pyramid boxes, today we'll show you how you can easily make a version of these boxes with a window yourself.
What do you need for this?
Material:
- 2x design papers or house paper of your choice
- Slightly thicker paper (for a stencil)
- Double-sided tape
Tool:
- Drawing triangle with cutting edge
- Cutter knife
- Pencil
- Eraser
- Ruler
- Bone folder /folding pen
- Optional: paper cutter with folding board
- Scissors
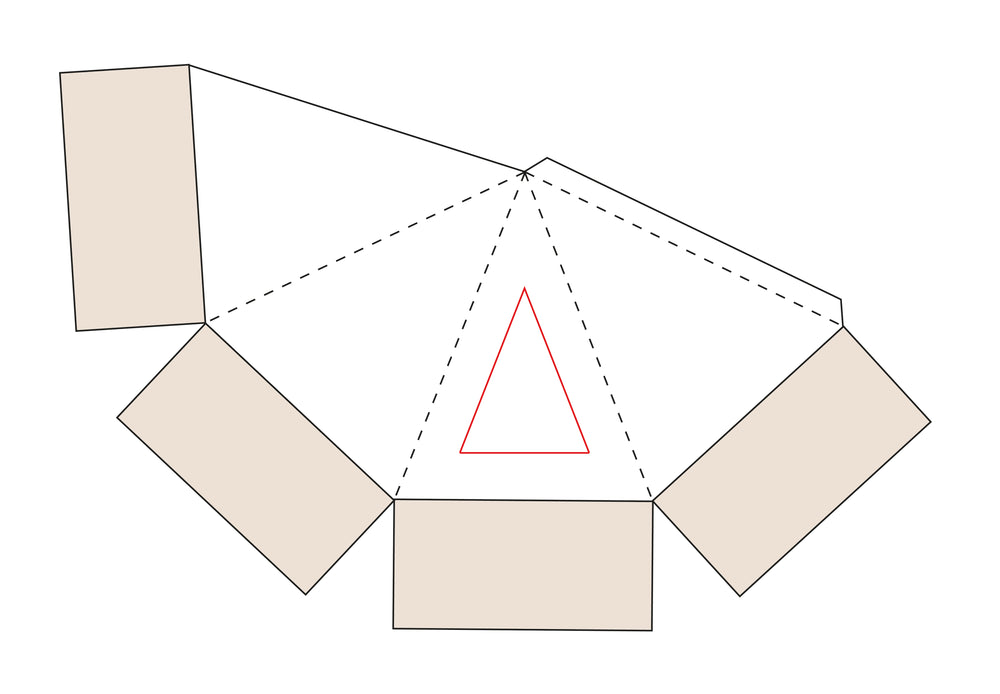
Step 1: Create a stencil
Cut out a stencil for the basic shape of the pyramid box.
To do this, use slightly thicker paper than usual printer paper. Now draw a triangle on it.
To do this, draw a line 11 cm long. Measure 14 cm in height from the middle of the line and mark this point with a pencil.
Now you can connect the ends of the 11 cm long line to the previously marked point.
You now have a triangle. Under this triangle, draw another adhesive tab with a width of 1 cm. Draw a fold line on the edge where the adhesive tab and triangle meet. Now cut out the entire template and make the adhesive tab a little smaller.


Step 2: Apply stencil to create the box
Now take a piece of design paper and place it in front of you.
Place the stencil in the bottom left corner. Trace the edges of it with a thin pencil. Then place the long edge of the triangle on the right of the long drawn edge and trace the stencil again here.
Repeat this step two more times until you have four triangles.
You also draw a 1 cm wide adhesive tab on the last triangle. Cut out the shape along the outer guidelines drawn. Taper the adhesive tabs a little.


The remaining lines drawn within the shape are the fold lines of the box.
Trace these and the fold lines along the adhesive tab of the individual triangles with a bone folder/folding pen or a paper cutter with a folding board .
Now erase the guide lines you drew for the fold lines and fold the basic shape once along the fold lines. You have the basic shape of the box ready.

Step 3: Cut the window
Next you have to cut out the window of the box. Take the cut out part of the basic shape and place it straight in front of you with the third triangle from the left.
From the bottom line of the triangle (fold line of the adhesive tab), at a height of 2 cm, draw a line 5.5 cm long in the middle. From the middle of the 5.5 cm long line, go up 7 cm and mark this point with a pencil.
Now you can connect the ends of the 5.5 cm long line to the previously marked point. You have now drawn the window of the box. You can now cut this out with a cutter knife .


Step 4: Attach floor pieces
For the bottom of the box you need to cut four more pieces of design paper measuring 5.5 cm x 11 cm. You can cut these out of the leftover paper from which you have already cut the basic shape. Now glue the cut out base parts to the outer adhesive tabs of the individual triangles.


Step 5: Interior part of the window
Now let's move on to the inner part of the window of the box. Cut this out from another piece of design paper. To do this, first draw a rectangle measuring 5.5 cm x 2.5 cm.
Draw 1 cm wide adhesive tabs on the left, bottom and right. Now draw a triangle on the top edge.
Go up again from the middle 7 cm and mark this spot.
Then draw lines from the top corners of the rectangle to the previously marked point.
For the side walls of the recess, you now have to draw a 2.5 cm long line from the upper corners of the rectangle at an angle of 20°.
From the ends of the lines you then draw a line again to the tip of the triangle.
You also draw a 1 cm wide adhesive tab on each of these lines.
Cut out the inside of the window along the outer lines, tapering the adhesive tabs.


All other lines result in the fold lines, which you have to trace with a folder/folding pen or the paper cutter with a folding board.
Remove the drawn guide lines again with an eraser.

Step 6: Finishing the Box
Now first glue the inside part of the window together. To do this, apply adhesive tape to the right and left flaps of the rectangle. Glue these tabs to the top small side triangles.
Make sure to attach the tabs to the outside so that they end up not being visible through the window.
Use the additional adhesive tabs to glue the inner part to the back of the window of the basic shape.
Once you have glued the inner part on, you can glue the whole box together. Fold the box along the fold lines and glue it shut with the adhesive tab.


For the floor, you can now fold in the floor flaps one after the other, finally tucking the last flap under the first flap.
This means the box can be easily opened again. However, you can also glue the floor shut.

The box is now finished. You can now decorate and fill these individually according to your wishes.

We hope you enjoy crafting!
From us for you ⭐
Gitti & graphics team
If you would like to see more of Gitti's works, follow her on Instagram at @schwetzbrigitte or check out her blog www.dreh-scheibe.de
The instructions are subject to alexandraRenke's Angel Policy.
This can be found at www.alexandra-renke.com.
Alexandra Renke
51503 Rösrath, Germany
© alexandra-renke.com
All rights reserved.
All rights reserved.